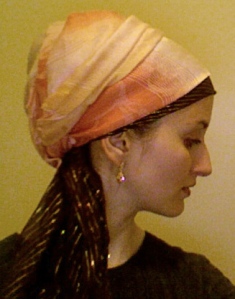
I’m so happy that so many people were inspired by the last photo post of creative ideas. You inspired me to make another one! Enjoy!
This is a simple (and just as stunning) version of the braid tie that I show in the video tutorial. Instead of using two scarves, you can just put a normal rectangular tichel on, and then add a sash and braid it in
I love having scarf ends that hang down! For this tie, I used a square scarf and did the second tie shown in the “beautiful basics” video. I then took a long, rectangular scarf and did a “regal wrap” on top. The two work together beautifully!
These are slight variations on the “double wrap” technique. For both of the photos, I did the second tie shown in the “beautiful basics” video, and then took a second scarf and did the same on top of the first one. You will be left with four tails hanging down. For the top photo, I took the white tails and spread them wide
 over my head, tucking the ends in. Then I took the teal scarf and twisted both ends over my head and into each other, making the crown part. For the second photo, I took the grey ends and spread them over my head, and used the remaining purple ends to make a bun (like the third tie in the “beautiful basics” video). Enjoy experimenting!
I felt like wearing something casual but elegant and flattering. For this tie, I used a basic square scarf underneath (second tie in “beautiful basics”) and tucked all the ends in. Then I used a long rectangular scarf and did a tie similar to the “regal wrap”. The only difference is that I tied both ends over the hair bump and was therefore left with longer ends which I double knotted at the bottom. Then I took a ribbon braid that I made (these are awesome and so easy to make!) and tied around the back to pull everything together.
This is a gorgeous look to wear to formal events! The shimmery scarves and accessories really highlighted my face. This tie is another variation on the “double wrap” technique. The only difference is that I put on a light blue headband (with tails) before putting on the upper scarf. Then I put the upper scarf on and let the blue peek through at the front. I tied both tails up at the back (with the blue showing as much as possible) and pinned it all together with a flower.
Here is a totally unique and easy way to cover your hair! (You can also make it very fancy depending on what scarf you use.) There’s only one layer on your head, so it’s great for the summer when you don’t want a lot of bulk. First I tied a long rectangular scarf around my head with the ends hanging evenly. If you want the twists at the end to be uneven, then you can make one end longer than the other. Then I twisted one end tightly and then folded the twist in half so it came together. Then I tucked the end in. Did the same to the other end and then pinned a flower. An easy, fun and flattering tie!


just beautiful. thank you so much for sharing!
LikeLike
Ribbon braid? Elaborate, please. Also, where do you get your flowers and how do you “pin” them in?
LikeLike
I just bought a bunch of ribbons from a fabric store and braided them (I got lucky… they were inexpensive leftover scraps!) Then I just took the braid and tied it around the scarf bun. The flowers in this post are all from Jerusalem, but you can find them in pretty much any accessory shop in the usa (I’m assuming that’s where you’re from?) A lot of them have a clip (like a hairclip) as well as a pin on the back. For these pictures I just “clip” it in wherever I can (Usually at the side, or around one of the tails I wrapped around a bun.) However, you can also use the pin and pin it in anywhere (it’s just harder to take out and not exactly Shabbat friendly). Hope this helps! Let me know if there’s anything you want me to elabourate on 🙂
LikeLike
I love the last look, it is beautiful but still seems uncomplicated! the flower adds the perfect flair and it seems you have a great eye for color.
LikeLike
Beautiful!
LikeLike
I am love, love, loving, that scarf!
LikeLike